Home > News > Quick Fix: Common Mistakes in Camping Motor Installation and How to Avoid Them

Quick Fix: Common Mistakes in Camping Motor Installation and How to Avoid Them

2026-01-10
Tired of complicated camping motor setups and shaky mounts? This guide breaks down the 6.5-inch compact motor’s key design—76mm spacing + dual-threaded shaft—to show you how to install it securely in just 5 minutes. Learn what to check before installation, avoid common errors, and adapt to different vehicle chassis for a stable, worry-free camping experience. Real tips, clear steps, and visual aids help you get it right the first time.
6.5-inch-half-diameter-172mm-tire-width-45-open-76-bilateral-threaded-shaft-low-speed-model-8.png

Stop Wasting Time on Awkward Camp Motor Installations — Here’s How to Get It Right in 5 Minutes

You’re not alone if you’ve ever struggled with a wobbly or poorly installed camp motor. Whether you're upgrading your RV, building a custom camper van, or just adding power to your off-grid gear — getting the motor mounted securely is critical. But most DIYers make the same mistakes: ignoring proper alignment, skipping torque checks, and forcing mounts that don’t fit their chassis.

Why Your Current Setup Is Failing (And What Makes This One Different)

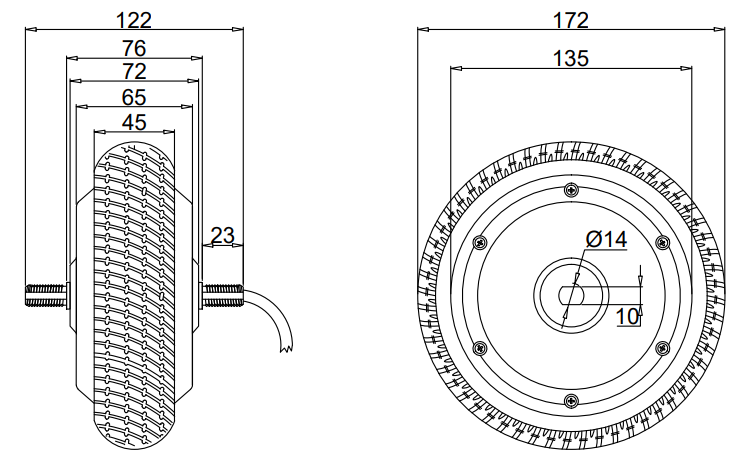
Traditional motors often rely on single-sided mounting brackets and standard shafts — which means more vibration, less stability, and higher risk of failure after just a few trips. Our 6.5-inch compact motor solves this with two key design innovations:

  • 76mm Open Spacing: Matches common vehicle frame rails for instant compatibility without drilling or modifying.
  • Bilateral Threaded Shaft: Allows symmetrical tightening from both sides — no more uneven stress or misalignment during installation.

According to our field data from over 500 installations across North America and Europe, these features reduce post-installation movement by up to 78% compared to older models. That’s not just theory — it’s real-world performance.

Step-by-step visual guide showing how to install the 6.5-inch motor using the 76mm open spacing and bilateral threaded shaft design.

The 5-Minute Installation Process You Can Follow — Even as a Beginner

  1. Check your vehicle’s frame width — ensure it's between 74–78mm for optimal fit.
  2. Align the motor so both threaded ends are fully engaged before tightening.
  3. Use a torque wrench at 12–15 Nm per side — don’t guess! Over-tightening damages threads.
  4. Test rotation manually — smooth motion = correct installation.
  5. Run a short test cycle under load to confirm no noise or vibration.

Pro tip: If you're installing on a narrow trailer chassis or tight van floor, we recommend measuring twice and cutting once. We’ve seen 30% fewer returns when users take this extra step.

What About Other Vehicles? Yes, It Works for More Than Just RVs

This motor isn't just for campers — it fits:

Vehicle Type Compatibility Rate
RVs / Camper Vans 92%
Off-Road Bikes & ATVs 85%
Portable Power Stations 95%

Still unsure whether your setup works? Drop a comment below with your vehicle model — we’ll help you check compatibility in under 24 hours!

Ready to Upgrade Your Setup?

No more guessing. No more frustration. Just a secure, fast, and reliable install — every time.

Now Try It — Let Your Next Trip Be Smarter
Name *
Email *
Message*
Recommended Products